Specific Process Knowledge/Characterization/Dektak XTA: Difference between revisions
| Line 82: | Line 82: | ||
<br> | <br> | ||
===Influence of Calibration Standard Uncertainty=== | ===Influence of Calibration Standard Uncertainty=== | ||
[[File:intrinsic step h error.png|upright=2|alt=Axes with Measured values versus expected values and three lines illustrating measured=expected, plus two not-quite straight lines illustrating the confidence intervals growing as the values grow constrained by the calibration standard measurements. Two diamonds illustrate the location of the calibration sample measurement points. The plot's title says "Error from intrinsic uncertainty step height used for calibration".|right|thumb|Figure 1: Measurement uncertainty from uncertainty in the calibration standard. Not to scale. The linearity of the sensor means that the measurement error increases approximately linearly with the size of the feature being measured. The percentage-wise error on the smallest standard step is larger than on the bigger standard step, so the lines are not totally straight.]] | [[File:intrinsic step h error.png|350px|upright=2|alt=Axes with Measured values versus expected values and three lines illustrating measured=expected, plus two not-quite straight lines illustrating the confidence intervals growing as the values grow constrained by the calibration standard measurements. Two diamonds illustrate the location of the calibration sample measurement points. The plot's title says "Error from intrinsic uncertainty step height used for calibration".|right|thumb|Figure 1: Measurement uncertainty from uncertainty in the calibration standard. Not to scale. The linearity of the sensor means that the measurement error increases approximately linearly with the size of the feature being measured. The percentage-wise error on the smallest standard step is larger than on the bigger standard step, so the lines are not totally straight.]] | ||
Nanolab staff check the instrument's measurement accuracy with a standard step height of 917 nm for the smaller ranges and 24.925 µm for the larger ranges, so that the middle ranges are checked with both standards. The 95 % confidence intervals for the standards are 17 nm for the 917 nm standard and 0.072 µm for the 24.925 µm standard. If the control measurement is beyond the limit set in our Quality Control procedure, the instrument is calibrated and the users informed (see LabManager for details, for instance the DektakXT [http://labmanager.dtu.dk/d4Show.php?id=2493&mach=304 control instruction] and [https://labmanager.dtu.dk/view_binary.php?type=data&mach=304 control measurement data]) | Nanolab staff check the instrument's measurement accuracy with a standard step height of 917 nm for the smaller ranges and 24.925 µm for the larger ranges, so that the middle ranges are checked with both standards. The 95 % confidence intervals for the standards are 17 nm for the 917 nm standard and 0.072 µm for the 24.925 µm standard. If the control measurement is beyond the limit set in our Quality Control procedure, the instrument is calibrated and the users informed (see LabManager for details, for instance the DektakXT [http://labmanager.dtu.dk/d4Show.php?id=2493&mach=304 control instruction] and [https://labmanager.dtu.dk/view_binary.php?type=data&mach=304 control measurement data]) | ||
| Line 89: | Line 89: | ||
<br clear="all" /> | <br clear="all" /> | ||
<br> | <br> | ||
===Total Uncertainty=== | ===Total Uncertainty=== | ||
[[File:Error probability distributions rev.png|upright=2|alt=Four different probability distributions that contribute to the total error on measurements with the DektakXT 6.5 micron range. By far the widest distribution is the one from the error on the standard step, which is a Gaussian. The others are the non-Gaussian spread of the average measurement of the standard height, which cuts off at the QC limits, the resolution, which is a very narrow uniform distribution, and the spread of measurement values for a given step being measured, which is a Gaussian whose width depends on the step in question.|right|thumb|Figure 2: The probability distributions of the main sources of error that are convoluted to create the total error on a profiler measurement.]] | [[File:Error probability distributions rev.png|upright=2|alt=Four different probability distributions that contribute to the total error on measurements with the DektakXT 6.5 micron range. By far the widest distribution is the one from the error on the standard step, which is a Gaussian. The others are the non-Gaussian spread of the average measurement of the standard height, which cuts off at the QC limits, the resolution, which is a very narrow uniform distribution, and the spread of measurement values for a given step being measured, which is a Gaussian whose width depends on the step in question.|right|thumb|Figure 2: The probability distributions of the main sources of error that are convoluted to create the total error on a profiler measurement.]] | ||
Revision as of 19:58, 27 May 2025
The content on this page, including all images and pictures, was created by DTU Nanolab staff, unless otherwise stated.
Feedback to this page: XTA click here
Dektak XTA Stylus Profiler
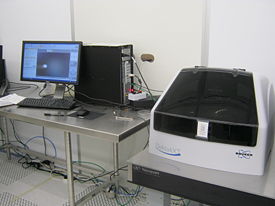
The Dektak XTA stylus profiler from Brüker is used for profiling surfaces of samples with structures in the micro- and nanometer range. The size of the structures that can be measured is limited by the tip dimensions.
A profile measurement can be done across a specific structure by using a high magnification camera to locate the structure. It is also possible to program the stylus to measure in several positions, defined with respect to some deskew points. Stress measurements of thin films can be done by measuring the wafer bow. However, for predefined measurement programs or stress measurements, we recommend the P17 profiler - see next section.
The user manual, quality control procedure and results, technical information and contact information can be found in LabManager.
Performance and Process Parameters

| Purpose | Profiler for measuring micro structures |
|
|---|---|---|
| Performance | Scan range x y |
Line scan x: 50 µm to 55 mm in a single scan, up to 200 mm with stiching |
| Scan range z |
50 Å to 1 mm | |
| Resolution x y |
Down to 0.003 µm theoretically, in practice limited by the tip radius | |
| Resolution z |
1 Å, 10 Å, 80 Å or 160 Å (for ranges 65 kÅ, 655 kÅ, 5240 kÅ and 1 mm respectively) | |
| Height accuracy z (95 % confidence) |
~ 2 % for a 1 µm step with the smallest measurement range and ~ 1 % for a 25 µm step for well-defined steps that are easy to measure (read about reducing and estimating the measurement uncertainty here) | |
| Max scan depth as a function of trench width W |
1.2*(W[µm]-5µm) | |
| Hardware settings | Tip radius |
|
| Substrates | Substrate size |
|
| Substrate materials allowed |
|
Measurement Accuracy
The accuracy of a height measurement with the profiler depends on the measurement settings, the sample, the instrument calibration and the resolution.
Adjust Measurement Settings for your Sample
Both the force setting and the scan speed are important: Too high force may compress a soft material like Al, Au or some polymers, while too low force may lead to the stylus "jumping" over features, especially if the scan speed is high. Too low scan speed may result in drift of the measurement and noise from vibrations while too high scan speed may mean that the stylus tip does not have time to reach the bottom of the features you are measuring and can also give rise to increased noise levels (see the DektakXT manual, Figure 3 for details).
A sharp vertical step is easiest to measure. If the step is gradual or the surface is rough, it can be difficult to determine where to measure and how the scan should be leveled. Underlying sample curvature can also make it hard to level the scan.
Influence of Calibration Standard Uncertainty

Nanolab staff check the instrument's measurement accuracy with a standard step height of 917 nm for the smaller ranges and 24.925 µm for the larger ranges, so that the middle ranges are checked with both standards. The 95 % confidence intervals for the standards are 17 nm for the 917 nm standard and 0.072 µm for the 24.925 µm standard. If the control measurement is beyond the limit set in our Quality Control procedure, the instrument is calibrated and the users informed (see LabManager for details, for instance the DektakXT control instruction and control measurement data)
All this means that the 95 % confidence interval of a 1 µm step measured with the smallest measurement range is at least the 1.8 % error of the standard step while the 95 % confidence interval of a 25 µm step measured with a larger range is at least the 0.3 % error of the standard step. Steps between 1 and 25 µm measured with the intermediate ranges will presumably have an intermediate error just due to the intrinsic uncertainty on the standard step height. See Figure 1.
Total Uncertainty

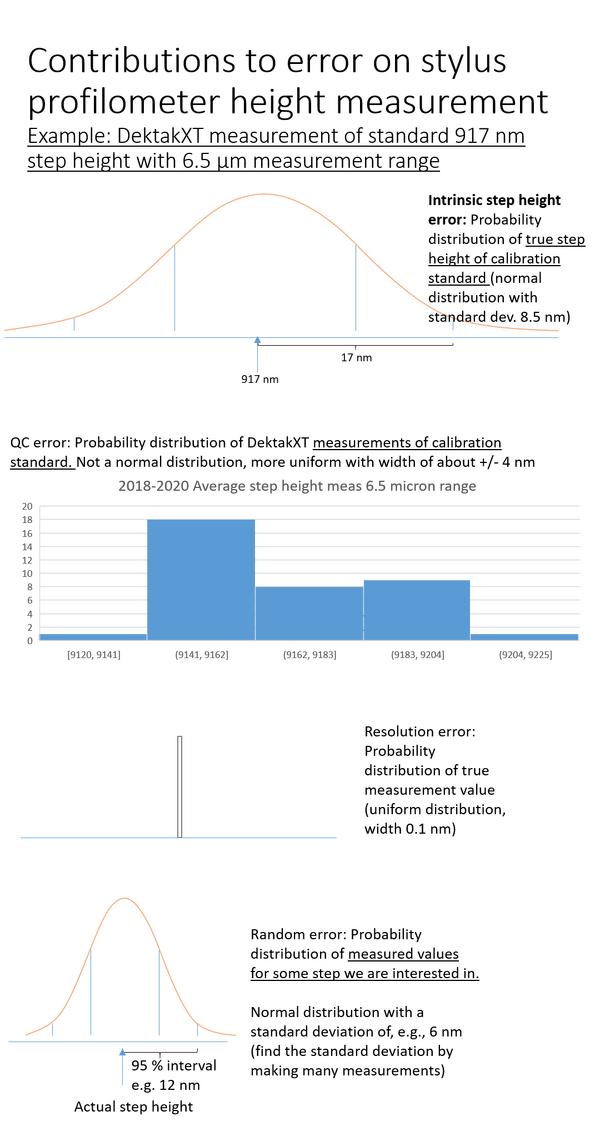
Apart from the error due to the standard step height's intrinsic uncertainty, there will be a contribution to the overall uncertainty from the deviation of the value that the profiler measures from the theoretical height of the standard step that could be called "QC error" (since we accept some variation in our quality control routine). In practice for the 917 nm standard this range is about ± 4 nm for the DektakXT and ± 8 nm for the P17, while for the large standard it ranges from about 0.06 µm on the DektakXT to about 0.15 µm on the P17.
There is also a tiny contribution to the total error from the instrument's limited resolution and finally of course there is random noise in any measurement. For many repeated measurements of the same line on the standard step height (a rigid, well defined vertical step) we have found the random error from the DektakXT is on the order of ± 5 nm for the 917 nm standard and 0.05 µm for the 24.925 µm standard. The random error with the P17 profiler is even smaller.
To estimate the overall accuracy of the profiler's measurements you can convolute these various sources of error. The error sources are shown graphically in Figure 2 for measuring the small standard step with the DektakXT's smallest range. You can see an uncertainty budget for the DektakXT measurements here (made by Rebecca Ettlinger): Media:uncertainty budget Dektak rev.xlsx. It is based on the assumption that all the error sources are independent and can therefore be added by the sum of squares method.
The resulting error calculation for the DektakXT of a 1 µm very well defined standard step is about 2 % (as the uncertainty on the calibration standard dominates), while for a very well defined step of 25 µm the cumulative error is about 0.7-1 %. These are the uncertainties listed in the technical specifications for the instruments. However, in real devices the random error will often be much larger than for our standard samples and so the real confidence interval will be larger.
To calculate the accuracy of your particular measurement, you should repeat the measurement several times and estimate the standard deviation. If the scatter is quite small you can try to calculate the total error on your measurement using the sum of squares method to combine the intrinsic step height error, the QC error and the random scatter error. If the scatter of your measurements is large that will be the dominant source of error in your measurement and you can safely ignore the other contributions.
