Specific Process Knowledge/Characterization/Four-Point Probe: Difference between revisions
| Line 5: | Line 5: | ||
There are two four point probes at Nanolab. Four point probe from Jandel is located inside the cleanroom(D-3) and Four-Point Probe from Veeco is now located in the basement(346-904). | There are two four point probes at Nanolab. Four point probe from Jandel is located inside the cleanroom(D-3) and Four-Point Probe from Veeco is now located in the basement(346-904). | ||
[[Image:Jandel_four_point_probe.PNG |thumb|400x400px|Four point probe: positioned in cleanroom D-3]] | |||
The Four point probe is manufactured by Jandel Engineering Limited and using Jandel probe head and the RM3000+ Test Unit which can supply constant current between 10nA and 99.99mA, and measure voltage from 0.01mV to 1250mV. | The Four point probe is manufactured by Jandel Engineering Limited and using Jandel probe head and the RM3000+ Test Unit which can supply constant current between 10nA and 99.99mA, and measure voltage from 0.01mV to 1250mV. | ||
For sheet resistance measurements, the quoted range is 1 milliohm/square to 5x10⁸ ohms/square. Measurements outside this range are possible but with possible reduced accuracy. For volume (bulk) resistivity measurements, the quoted range is 1 milliohm.cm to 1x10⁶ ohm.cm. Measurements outside of this range may be possible but will depend on sample type e.g. whether the sample is a thin layer. | |||
For sheet resistance measurements, the quoted range is 1 milliohm/square to 5x10⁸ ohms/square. Measurements outside this range are possible but with possible reduced accuracy. | |||
For volume (bulk) resistivity measurements, the quoted range is 1 milliohm.cm to 1x10⁶ ohm.cm. Measurements outside of this range may be possible but will depend on sample type e.g. whether the sample is a thin layer. | |||
Multiposition Probe stand can measure on wafers up to 200mm diameter. The Θ movement clicks in four positions at 90 degrees and the linear movement in up to 10 positions giving repeat placement accuracy of +/- 1mm. | Multiposition Probe stand can measure on wafers up to 200mm diameter. The Θ movement clicks in four positions at 90 degrees and the linear movement in up to 10 positions giving repeat placement accuracy of +/- 1mm. | ||
Revision as of 14:29, 7 August 2019
Four-Point Probe
Feedback to this page: click here
There are two four point probes at Nanolab. Four point probe from Jandel is located inside the cleanroom(D-3) and Four-Point Probe from Veeco is now located in the basement(346-904).

The Four point probe is manufactured by Jandel Engineering Limited and using Jandel probe head and the RM3000+ Test Unit which can supply constant current between 10nA and 99.99mA, and measure voltage from 0.01mV to 1250mV.
For sheet resistance measurements, the quoted range is 1 milliohm/square to 5x10⁸ ohms/square. Measurements outside this range are possible but with possible reduced accuracy. For volume (bulk) resistivity measurements, the quoted range is 1 milliohm.cm to 1x10⁶ ohm.cm. Measurements outside of this range may be possible but will depend on sample type e.g. whether the sample is a thin layer.
Multiposition Probe stand can measure on wafers up to 200mm diameter. The Θ movement clicks in four positions at 90 degrees and the linear movement in up to 10 positions giving repeat placement accuracy of +/- 1mm.
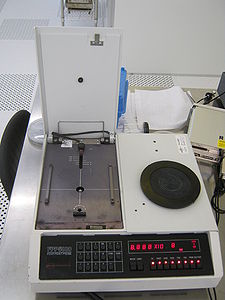
The Four-Point Probe is a Veeco FPP-5000 for I/V measurement. The main purpose is to measure resistance and resistivity on a 4" silicon wafer. But can also be used to find thickness of thin layers or test if is a N- or P-type wafer.
The wafer are pushed down on the four pins so a measurement is performed. It works only for 4" wafers because a special holder is need.

The user manual, technical information and contact information can be found in LabManager:
| Purpose | Resistance and resistivity measurement | |
|---|---|---|
| Process parameter range | Process Temperature |
|
| Process pressure |
| |
| Substrates | Batch size |
|
| Substrate material allowed |
|
