Specific Process Knowledge/Characterization/Drop Shape Analyzer: Difference between revisions
Appearance
| (32 intermediate revisions by 5 users not shown) | |||
| Line 1: | Line 1: | ||
'''Feedback to this page''': '''[mailto:labadviser@ | '''Feedback to this page''': '''[mailto:labadviser@nanolab.dtu.dk?Subject=Feed%20back%20from%20page%20http://labadviser.nanolab.dtu.dk/index.php/Specific_Process_Knowledge/Characterization/Drop_Shape_Analyzer click here]''' | ||
<!--Checked for updates on 5/10-2020 - ok/jmli --> | |||
== The Drop Shape Analyzer == | |||
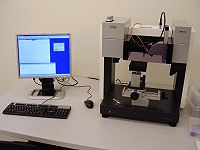
[[image:DropShapeAnalyzer.jpg|200x200px|right|thumb|The Krüss DSA 100s Drop Shape Analyzer in Cleanroom A-1]] | |||
The Krüss DSA 100S Drop Shape Analyzer will analyze the shape a drop of liquid on a surface, or suspended from a needle, in order to calculate the contact angle, or the surface tension, respectively. | The Krüss DSA 100S Drop Shape Analyzer will analyze the shape of a drop of liquid on a surface, or suspended from a needle, in order to calculate the contact angle, or the surface tension, respectively. It is mostly used to determine the contact angle of water as a measure of the hydrophobicity/hydrophilicity of the sample surface. | ||
'''The user manual, user APV(s), technical information, and contact information can be found in LabManager:''' | '''The user manual, user APV(s), technical information, and contact information can be found in LabManager:''' | ||
[ | [https://labmanager.dtu.dk/function.php?module=Machine&view=view&mach=520 Drop Shape Analyzer in LabManager] | ||
==An overview of the performance of the | ==An overview of the performance of the Drop Shape Analyzer== | ||
{| border="2" cellspacing="0" cellpadding="10" | {| border="2" cellspacing="0" cellpadding="10" | ||
|- | |- | ||
!style="background:silver; color:black;" align="left"|Purpose | !style="background:silver; color:black;" align="left"|Purpose | ||
|style="background:LightGrey; color:black"| | |style="background:LightGrey; color:black"|Imaging and analysis of of the shape of the interface between liquid and air||style="background:WhiteSmoke; color:black"| | ||
*Measurement of | *Measurement of contact angle between sample surface and liquid | ||
* | *Measurement of surface tension of liquid | ||
|- | |- | ||
!style="background:silver; color:black" align="left"|Performance | !style="background:silver; color:black" align="left"|Performance | ||
|style="background:LightGrey; color:black"| | |style="background:LightGrey; color:black"|Measurement accuracy | ||
|style="background:WhiteSmoke; color:black"| | |||
*Highly dependent on analysis conditions (image quality and fitting model) and method used; usually around ±0.5°. Using several measurement points is recommended. | |||
|- | |- | ||
!style="background:silver; color:black" align="left"|Process parameters | |||
|style="background:LightGrey; color:black"| | |style="background:LightGrey; color:black"|Available liquids | ||
|style="background:WhiteSmoke; color:black"| | |style="background:WhiteSmoke; color:black"| | ||
* | *Syringe 1: Water (H<sub>2</sub>O) | ||
*Syringe 2: Diiodo-methane (CH<sub>2</sub>I<sub>2</sub>) | |||
*Manual dispense is also possible | |||
|- | |- | ||
!style="background:silver; color:black" align="left"|Sample requirements | |||
|style="background:LightGrey; color:black"| | |style="background:LightGrey; color:black"|Substrate material allowed | ||
|style="background:WhiteSmoke; color:black"| | |style="background:WhiteSmoke; color:black"| | ||
* | *In principle all materials allowed in cleanroom | ||
|- | |- | ||
|style="background:silver; color:black"| | |style="background:silver; color:black"| | ||
|style="background:LightGrey; color:black"| | |style="background:LightGrey; color:black"|Substrate size | ||
|style="background:WhiteSmoke; color:black"| | |style="background:WhiteSmoke; color:black"| | ||
* | *Up to 6" wafers. In order to measure, a few mm<sup>2</sup> of flat surface is required. | ||
|- | |- | ||
|style="background:silver; color:black"| | |||
| | |||
|style="background:LightGrey; color:black"|Batch size | |style="background:LightGrey; color:black"|Batch size | ||
|style="background:WhiteSmoke; color:black"| | |style="background:WhiteSmoke; color:black"| | ||
*One sample at a time | *One sample at a time | ||
|- | |- | ||
|} | |} | ||
Latest revision as of 14:58, 23 November 2023
Feedback to this page: click here
The Drop Shape Analyzer

The Krüss DSA 100S Drop Shape Analyzer will analyze the shape of a drop of liquid on a surface, or suspended from a needle, in order to calculate the contact angle, or the surface tension, respectively. It is mostly used to determine the contact angle of water as a measure of the hydrophobicity/hydrophilicity of the sample surface.
The user manual, user APV(s), technical information, and contact information can be found in LabManager:
Drop Shape Analyzer in LabManager
An overview of the performance of the Drop Shape Analyzer
| Purpose | Imaging and analysis of of the shape of the interface between liquid and air |
|
|---|---|---|
| Performance | Measurement accuracy |
|
| Process parameters | Available liquids |
|
| Sample requirements | Substrate material allowed |
|
| Substrate size |
| |
| Batch size |
|
