Specific Process Knowledge/Characterization/Profiler/Stylus profiler measurement uncertainty
Feedback to this page: click here
Stylus profiler measurement accuracy
The accuracy of a height measurement with the profiler depends on the measurement settings, the sample, the instrument calibration and the resolution.
Use the right measurement settings for your sample
Both the force setting and the scan speed are important: Too high force may compress a soft material like Al, Au or some polymers, while too low force may lead to the stylus "jumping" over features, especially if the scan speed is high. Too low scan speed may result in drift of the measurement and lots of noise while too high scan speed may mean that the stylus tip does not have time to reach the bottom of the features you are measuring (see the DektakXT manual, Figure 3 for details).
A sharp vertical step is easiest to measure. If the step is gradual or the surface is very rough, it can be difficult to determine where to measure and how the scan should be leveled.
Influence of calibration standard uncertainty
Nanolab staff check the instrument's measurement accuracy with a standard step height of 917 nm for the three smaller ranges and 24.925 µm for the three larger ranges, so that the two middle ranges are checked with both standards. The 95 % confidence intervals for the standards are 17 nm for the 917 nm standard and 0.072 µm for the 24.925 µm standard. If the control measurement is beyond the limit set in our Quality Control procedure, the instrument is calibrated and the users informed (see LabManager for details on the control instruction and the control measurement data).
All this means that the 95 % confidence interval of a 1 µm step measured with the 6.5 kÅ range is at least the 1.8 % error of the standard step while the 95 % confidence interval of a 25 µm step measured with the largest range is at least the 0.3 % error of the standard step. Steps between 1 and 25 µm measured with the intermediate ranges will presumably have an intermediate error just due to the calibration uncertainty while the calibration-related uncertainty increase slightly percentagewise for smaller or larger steps. This because an actuator has to translate the vertical stylus movement to an electronic signal and if there is a slight offset or error in the calibration factor this is amplified the further you get from the calibration value.
Total uncertainty

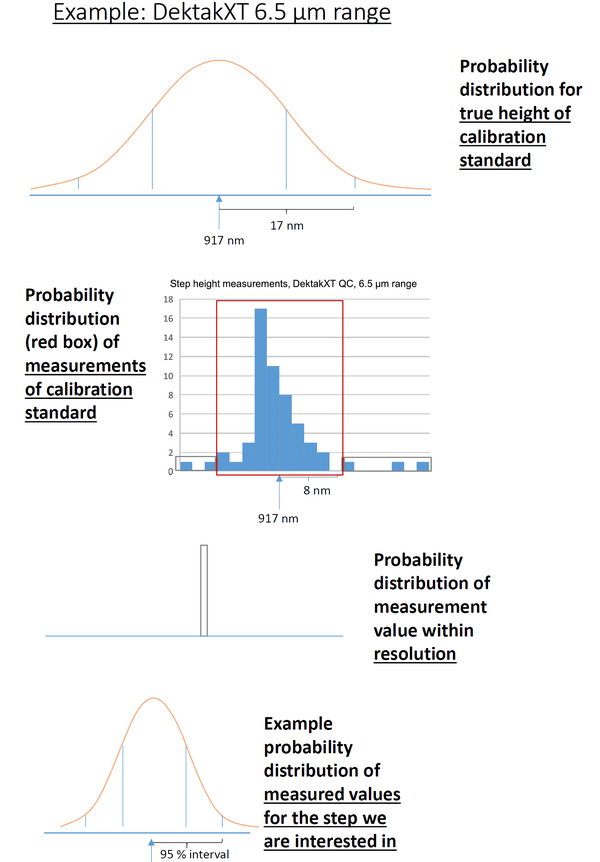
Apart from the error due to the calibration standard's uncertainty, there will be random noise in any measurement, which we have found for many repeated measurements of the standard step height (a rigid, well defined vertical step) is on the order of ± 5 nm for the 917 nm standard and 0.05 µm for the 24.925 µm sample. There is also a tiny contribution to the error from the instrument's resolution and a contribution from the spread of values that the Dektak actually measures compared to the theoretical height of the standard step height.
To estimate the overall accuracy of the Dektak's measurements you can convolute the various sources of error. The error sources to be convoluted are shown graphically on the right. You can see an uncertainty budget for the Dektak measurements here (made by Rebecca Ettlinger): Media:uncertainty budget Dektak rev.xlsx. It is based on the assumption that all the error sources are independent and can therefore be added by the sum of squares method.
The resulting error calculation for a 1 µm very well defined standard step is about 2 % (as the uncertainty on the calibration standard dominates), while for a very well defined step of 25 µm the cumulative error is about 0.7-1 %. These are the uncertainties listed in the table. However, in real devices the random error will often be much larger than for our standard samples and so the real confidence interval will be larger.
To improve the accuracy of your particular measurement, you should repeat the measurement several times and estimate the standard deviation. If the scatter is quite small you can try to include the calibration error as a percentage of the step height in your estimate of the total error using the sum of squares method as done in the uncertainty budget above. If the scatter of your measurements is large that will probably be the dominant source of error in your measurement.
