Specific Process Knowledge/Thermal Process/RTP Jipelec 2: Difference between revisions
| (53 intermediate revisions by 2 users not shown) | |||
| Line 1: | Line 1: | ||
''This page is written by Inês Diogo@DTU Nanolab if nothing else is stated.'' | |||
'''Feedback to this page''': '''[mailto:labadviser@danchip.dtu.dk?Subject=Feed%20back%20from%20page%20http://labadviser.nanolab.dtu.dk/index.php/Specific_Process_Knowledge/Thermal_Process/RTP_Jipelec_2 click here]''' | '''Feedback to this page''': '''[mailto:labadviser@danchip.dtu.dk?Subject=Feed%20back%20from%20page%20http://labadviser.nanolab.dtu.dk/index.php/Specific_Process_Knowledge/Thermal_Process/RTP_Jipelec_2 click here]''' | ||
[[index.php?title=Category:Equipment|Thermal Jipelec]] | |||
[[index.php?title=Category:Thermal process|Jipelec]] | |||
=RTP2 Jipelec - Rapid Thermal Processor= | |||
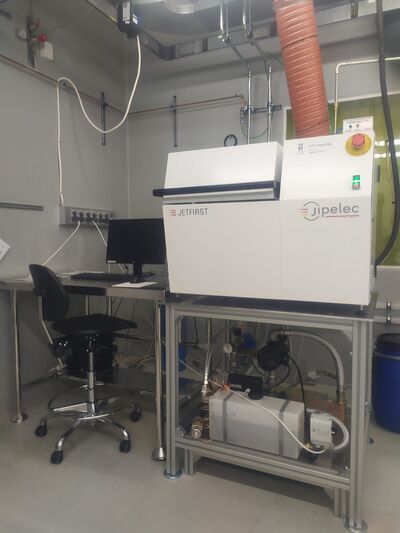
[[Image:Tool+operator station.jpg|400px|thumb|The RTP2 Jipelec and work station are located in the DTU Nanolab cleanroom A-5. Photo: Inês Diogo@DTU Nanolab, July 2023]] | [[Image:Tool+operator station.jpg|400px|thumb|The RTP2 Jipelec and work station are located in the DTU Nanolab cleanroom A-5. Photo: Inês Diogo@DTU Nanolab, July 2023]] | ||
| Line 18: | Line 17: | ||
==The Set-Up== | ==The Set-Up== | ||
The machine consists of a reactor chamber, in which different samples can be processed/annealed at temperatures up to | The machine consists of a reactor chamber, in which different samples can be processed/annealed at temperatures up to 1100 °C. | ||
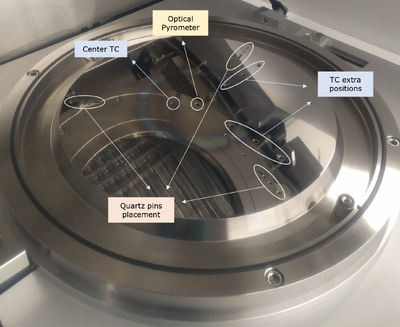
The chamber can be heated up very rapidly by the use of 18 infrared halogen lamps that are situated in the chamber lid. A quartz plate is placed below the lamps, i.e. between the lamps and the sample(s). Below the platen, there is an optical pyrometer aligned with the center of the substrate, that is placed on the bottom part of the chamber. The platen presents additional inlets where multiple thermocouples can be mounted | The chamber can be heated up very rapidly by the use of 18 infrared halogen lamps that are situated in the chamber lid. A quartz plate is placed below the lamps, i.e. between the lamps and the sample(s). Below the platen, there is an optical pyrometer aligned with the center of the substrate, that is placed on the bottom part of the chamber. The platen presents additional inlets where multiple thermocouples can be mounted (image on the right). | ||
[[Image:Platen with captions.png|400px|thumb|RTP2 Jipelec chamber platen. Image: Inês Diogo@DTU Nanolab, July 2023]] | |||
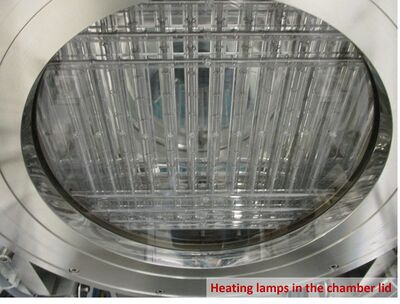
The lamps are divided in three zones so that a uniform temperature can be obtained over the substrate. During the heating, the quartz window below the lamps will get warm. However, the chamber walls are cooled by a cooling water flow and thus remain cold to prevent sample contamination. As already mentioned, the cooling unit is located under the machine. The lamps are cooled by cooling fans (no noisy compressed air cooling like in the old Jipelec RTP). The halogen lamps and the quartz plate are visible in the image below. | The lamps are divided in three zones so that a uniform temperature can be obtained over the substrate. During the heating, the quartz window below the lamps will get warm. However, the chamber walls are cooled by a cooling water flow and thus remain cold to prevent sample contamination. As already mentioned, the cooling unit is located under the machine. The lamps are cooled by cooling fans (no noisy compressed air cooling like in the old Jipelec RTP). The halogen lamps and the quartz plate are visible in the image below. | ||
| Line 33: | Line 32: | ||
==Temperature Measurement and Control== | ==Temperature Measurement and Control== | ||
The temperature of the substrate can be controlled by two different modes. The preferred one is called the closed loop mode, i.e. the temperature control mode (pyrometer or thermocouple control). On the other hand, an open loop mode (power control mode), although possible, is not recommended to be used as default. In the latter, the temperature of the substrate would vary according to the power emitted by the lamps that is established as setpoint, without any limiting check from the pyrometer or thermocouple. Thus, it can happen that the chamber is heated up very fast with no actual temperature control, which can induce serious damages to the tool. | |||
In RTP2 Jipelec, the pyrometer (Pyro1) is used as the default control sensor and it is always present. The thermocouples are not intended to be used for high-temperature processes - at 1000 °C or above - as a lifetime reduction can be expected if they are used in such conditions. As such, the thermocouple (TC1) should only be mounted and used as temperature control if the process temperature ranges RT to 150 °C. Mounting the thermocouples must only be carried out by the responsible persons - users do not need to know how to do it. | |||
Nonetheless, while processing, it is possible to have up to three thermocouples measuring the temperature - TC1, TC2 and TC3 - in conjugation with the optical pyrometer. A short description of each component can be found below. | |||
*'''TC1 (optional)''' - This is called the control thermocouple, only mounted when temperatures ranging RT to 150 °C are needed. When using a susceptor, it corresponds to a long, thin TC that is placed in a hole at the edge of the susceptor. On the other hand, if a wafer is directly placed on top of the quartz pins or a carrier wafer is being used, it is not possible to use this long TC. Thus, TC1 corresponds to a thick TC positioned in contact with the back of the wafer/carrier, approximately in the center. Regardless its type, it is very important that the TC is placed correctly and that contact with the substrate is ensured, otherwise the temperature measurement will not be correct. | |||
*'''TC2 and TC3 (uniformity calibrations, optional)''' - These are reference TCs, these do not control the temperature and do not need to be present. They can be placed in six other positions across the platen (see image in section 6.2), in conjugation to TC1. These TCs can be used to measure the temperature uniformity over a wafer or susceptor. However, the temperature measurement, and ultimately the uniformity interpretation, will always be very dependent on the quality of the contact between each TC and the wafer or susceptor. | |||
*'''Optical Pyrometer (mandatory)''' - The pyrometer is making an non-contact optical temperature measurement in the center of the susceptor or wafer. To ensure that the temperature measured by the pyrometer is correct, a temperature calibration must be done, for which the TC1 is used as a reference. To get the most correct temperature measurement, a pyrometer calibration should be done for each substrate type (thickness, size, material, etc.). | |||
The machine has a PID regulator for the temperature control. For each substrate type, thickness, size, material and desired process these PID settings have to be optimized in order to ensure that the actual temperature matches the settings as good as possible and no damage is induced to the tool while processing. | |||
==Samples and Process Specifications== | ==Samples and Process Specifications== | ||
| Line 41: | Line 54: | ||
|style="background:WhiteSmoke; color:black;" align="center"|<b>Comments</b> | |style="background:WhiteSmoke; color:black;" align="center"|<b>Comments</b> | ||
|- | |- | ||
!style="background:Silver; color:black" align="center" align="center" rowspan=" | !style="background:Silver; color:black" align="center" align="center" rowspan="3"|Temperature | ||
|style="background:Silver; color:black"|Pyro Control | |style="background:Silver; color:black"|Pyro Control | ||
|style="background:LightGrey; color:black"| | |style="background:LightGrey; color:black"| | ||
* 400 <sup>o</sup>C to | * 150 <sup>o</sup>C to 1100 <sup>o</sup>C (Susceptor) | ||
* 400 <sup>o</sup>C to 1100 <sup>o</sup>C (Si-based wafer) | |||
|style="background:WhiteSmoke; color:black;" align="left"| | |||
|- | |||
|style="background:Silver; color:black" rowspan="2"|Thermocouple Control | |||
|style="background:LightGrey; color:black"| | |||
* '''Vacuum''' --> Room temperature to 400 <sup>o</sup>C | |||
|style="background:WhiteSmoke; color:black;" align="left"| | |style="background:WhiteSmoke; color:black;" align="left"| | ||
|- | |- | ||
|style="background:LightGrey; color:black"| | |style="background:LightGrey; color:black"| | ||
* Room temperature to | * '''No vacuum''' --> Room temperature to 1000 <sup>o</sup>C | ||
|style="background:WhiteSmoke; color:black;" align="left"| | |style="background:WhiteSmoke; color:black;" align="left"| | ||
|- | |- | ||
| Line 84: | Line 102: | ||
|style="background:WhiteSmoke; color:black;" align="left"|5/6 mbar, if minimum gas flow is used during process. | |style="background:WhiteSmoke; color:black;" align="left"|5/6 mbar, if minimum gas flow is used during process. | ||
|- | |- | ||
!style="background:Silver; color:black" | ! rowspan="7" |Process time | ||
| style="background:Silver; color:black" |At 1100 <sup>o</sup>C | |||
|style="background:Silver; color:black"|At | | style="background:LightGrey; color:black" | | ||
*Max. 5 minutes | |||
| style="background:WhiteSmoke; color:black;" align="left" | | |||
|- | |||
|style="background:Silver; color:black"|At 1000 <sup>o</sup>C | |||
|style="background:LightGrey; color:black"| | |style="background:LightGrey; color:black"| | ||
*Max. 10 | *Max. 10 minutes | ||
|style="background:WhiteSmoke; color:black;" align=" | |style="background:WhiteSmoke; color:black;" align="left"| | ||
|- | |||
|style="background:Silver; color:black"|At 900 <sup>o</sup>C | |||
|style="background:LightGrey; color:black"| | |||
*Max. 20 minutes | |||
|style="background:WhiteSmoke; color:black;" align="left"| | |||
|- | |||
|style="background:Silver; color:black"|At 800 <sup>o</sup>C | |||
|style="background:LightGrey; color:black"| | |||
*Max. 30 minutes | |||
|style="background:WhiteSmoke; color:black;" align="left"| | |||
|- | |||
|style="background:Silver; color:black"|At 700 <sup>o</sup>C | |||
|style="background:LightGrey; color:black"| | |||
*Max. 1 hour | |||
|style="background:WhiteSmoke; color:black;" align="left"| | |||
|- | |- | ||
|style="background:Silver; color:black"| | |style="background:Silver; color:black"|< 700 <sup>o</sup>C | ||
|style="background:LightGrey; color:black"| | |style="background:LightGrey; color:black"| | ||
*Max. | *Max. 2 hours | ||
|style="background:WhiteSmoke; color:black;" align="left"| | |style="background:WhiteSmoke; color:black;" align="left"| | ||
|- | |- | ||
|style="background:Silver; color:black"| | |style="background:Silver; color:black"|< 500 <sup>o</sup>C | ||
|style="background:LightGrey; color:black"| | |style="background:LightGrey; color:black"| | ||
*Max. | *Max. 5 hours | ||
|style="background:WhiteSmoke; color:black;" align="left"| | |style="background:WhiteSmoke; color:black;" align="left"| | ||
|- | |- | ||
| Line 105: | Line 142: | ||
|style="background:LightGrey; color:black"| | |style="background:LightGrey; color:black"| | ||
* '''Max. 100 <sup>o</sup>C/s''' with '''carrier wafer''' or '''sample wafer''' | * '''Max. 100 <sup>o</sup>C/s''' with '''carrier wafer''' or '''sample wafer''' | ||
* '''Max. | * '''Max. 20 <sup>o</sup>C/s''' with SiC-coated graphite '''susceptor''' | ||
|style="background:WhiteSmoke; color:black;" align="left"| At faster heating rates, the actual temperature might overshoot from the temperature setpoint in the recipe, and the susceptors/carriers might break. | |style="background:WhiteSmoke; color:black;" align="left"| At faster heating rates, the actual temperature might overshoot from the temperature setpoint in the recipe, and the susceptors/carriers might break. | ||
|- | |- | ||
| Line 126: | Line 163: | ||
*Quartz | *Quartz | ||
*Metals - ask for permisson | *Metals - ask for permisson | ||
*III-V materials - '''these cannot be heated above 450 °C,''' otherwise it can lead to outgassing of toxic gases. For that reason, '''III-V samples are limited to a maximum process temperature of | *III-V materials - '''these cannot be heated above 450 °C,''' otherwise it can lead to outgassing of toxic gases. For that reason, '''III-V samples are limited to a maximum process temperature of 400 °C.''' | ||
|style="background:WhiteSmoke; color:black;" align="left"| Always check the cross contamination information in LabManager to see whether your samples are allowed in the RTP2 Jipelec before using it. If you want to anneal sample materials that are not on the list or not approved, please contact | |style="background:WhiteSmoke; color:black;" align="left"| Always check the cross contamination information in LabManager to see whether your samples are allowed in the RTP2 Jipelec before using it. If you want to anneal sample materials that are not on the list or not approved, please contact the Thin Film group | ||
|- | |- | ||
|} | |} | ||
'''*Remark!''' The time limits are not implemented in the software, but it is very important to obey these. If processing is done for longer times than those defined in the table, there is a certain risk that the chamber gets overheated, which can lead to damage of the equipment. | |||
==Existing PID and Pyro Calibration Tables== | |||
As mentioned before, the temperature inside the chamber is controlled by either using a thermocouple and/or an optical pyrometer. In order to guarantee a smooth temperature control while processing, it is important that the right couple of tables - PID and Pyrometer Calibration - are selected in the recipe. There are multiple PID and Pyro Calibration tables available at the tool, which were developed and optimized by the process specialists in the Thin Film group. These are material- and sensor-dependent, so they are labeled with abreviations of the conditions they should be used for. You can access the list of the existing tables in the '''[https://labmanager.dtu.dk/function.php?module=Machine&view=view&mach=459 tool's Labmanager page]''', under documents. | |||
*PID tables - This table contains the essential coefficients that manage the lamps' power output, ensuring a smooth and controlled process to maintain the temperature at the desired setpoint during processing. | |||
*Pyro Cal Tables - Calibrating the optical pyrometer requires the use of a thermocouple as a reference, given that optical pyrometry is a non-contact temperature measurement method. As a result of such calibration process, a table is created. The pyrometer calibration table correlates temperatures recorded by the reference thermocouple with the electrical signals produced by the pyrometer. Essentially, this table functions as a 'translator,' indicating to the user the temperature corresponding to a specific output from the pyrometer. | |||
==Additional information== | ==Additional information== | ||
The '''user manual''', user '''APV''', '''technical and contact information''' can be found in LabManager: '''[http://www.labmanager.dtu.dk/function.php?module=Machine&view=view&mach=459 RTP2 Jipelec]''' | The '''user manual''', user '''APV''', '''technical documents and contact information''' can be found in LabManager: '''[http://www.labmanager.dtu.dk/function.php?module=Machine&view=view&mach=459 RTP2 Jipelec]''' | ||
Latest revision as of 10:02, 4 February 2026
This page is written by Inês Diogo@DTU Nanolab if nothing else is stated.
Feedback to this page: click here
RTP2 Jipelec - Rapid Thermal Processor

The main purpose of the RTP2 Jipelec (Jipelec JetFirst 200 RTP) is to perform thermal processes, using faster heating rates and shorter process durations when compared to conventional methods. This is called rapid thermal processing (RTP) and can be used to treat different types of samples.
Rapid thermal processing typically includes RTA, i.e. Rapid Thermal Annealing, where samples are heated up very rapidly in a nitrogen or argon atmosphere. Contact alloying and RTN, i.e. Rapid Thermal Nitridation, might also be possible for some samples.
The Set-Up
The machine consists of a reactor chamber, in which different samples can be processed/annealed at temperatures up to 1100 °C.
The chamber can be heated up very rapidly by the use of 18 infrared halogen lamps that are situated in the chamber lid. A quartz plate is placed below the lamps, i.e. between the lamps and the sample(s). Below the platen, there is an optical pyrometer aligned with the center of the substrate, that is placed on the bottom part of the chamber. The platen presents additional inlets where multiple thermocouples can be mounted (image on the right).

The lamps are divided in three zones so that a uniform temperature can be obtained over the substrate. During the heating, the quartz window below the lamps will get warm. However, the chamber walls are cooled by a cooling water flow and thus remain cold to prevent sample contamination. As already mentioned, the cooling unit is located under the machine. The lamps are cooled by cooling fans (no noisy compressed air cooling like in the old Jipelec RTP). The halogen lamps and the quartz plate are visible in the image below.

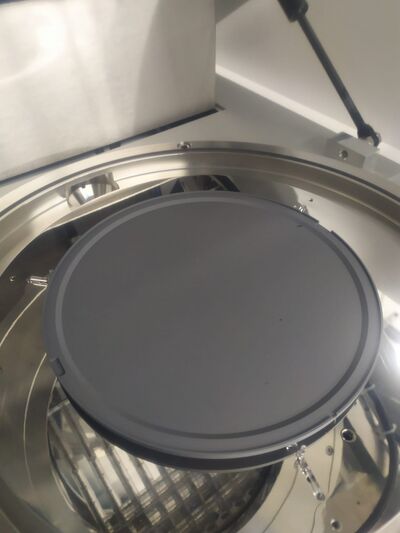
The samples are placed above the round metal plate in the bottom of the chamber, i.e. below the halogen lamps. The substrates are meant to be placed on top of three quartz pins. Depending on the type and size of the substrate, there are three types of quartz pins available (for the SiC-coated graphite susceptor, a 100 mm wafer and for a 150 mm wafer). Nonetheless, the susceptor should always be used, when possible (except for 8" wafers).

Temperature Measurement and Control
The temperature of the substrate can be controlled by two different modes. The preferred one is called the closed loop mode, i.e. the temperature control mode (pyrometer or thermocouple control). On the other hand, an open loop mode (power control mode), although possible, is not recommended to be used as default. In the latter, the temperature of the substrate would vary according to the power emitted by the lamps that is established as setpoint, without any limiting check from the pyrometer or thermocouple. Thus, it can happen that the chamber is heated up very fast with no actual temperature control, which can induce serious damages to the tool.
In RTP2 Jipelec, the pyrometer (Pyro1) is used as the default control sensor and it is always present. The thermocouples are not intended to be used for high-temperature processes - at 1000 °C or above - as a lifetime reduction can be expected if they are used in such conditions. As such, the thermocouple (TC1) should only be mounted and used as temperature control if the process temperature ranges RT to 150 °C. Mounting the thermocouples must only be carried out by the responsible persons - users do not need to know how to do it.
Nonetheless, while processing, it is possible to have up to three thermocouples measuring the temperature - TC1, TC2 and TC3 - in conjugation with the optical pyrometer. A short description of each component can be found below.
- TC1 (optional) - This is called the control thermocouple, only mounted when temperatures ranging RT to 150 °C are needed. When using a susceptor, it corresponds to a long, thin TC that is placed in a hole at the edge of the susceptor. On the other hand, if a wafer is directly placed on top of the quartz pins or a carrier wafer is being used, it is not possible to use this long TC. Thus, TC1 corresponds to a thick TC positioned in contact with the back of the wafer/carrier, approximately in the center. Regardless its type, it is very important that the TC is placed correctly and that contact with the substrate is ensured, otherwise the temperature measurement will not be correct.
- TC2 and TC3 (uniformity calibrations, optional) - These are reference TCs, these do not control the temperature and do not need to be present. They can be placed in six other positions across the platen (see image in section 6.2), in conjugation to TC1. These TCs can be used to measure the temperature uniformity over a wafer or susceptor. However, the temperature measurement, and ultimately the uniformity interpretation, will always be very dependent on the quality of the contact between each TC and the wafer or susceptor.
- Optical Pyrometer (mandatory) - The pyrometer is making an non-contact optical temperature measurement in the center of the susceptor or wafer. To ensure that the temperature measured by the pyrometer is correct, a temperature calibration must be done, for which the TC1 is used as a reference. To get the most correct temperature measurement, a pyrometer calibration should be done for each substrate type (thickness, size, material, etc.).
The machine has a PID regulator for the temperature control. For each substrate type, thickness, size, material and desired process these PID settings have to be optimized in order to ensure that the actual temperature matches the settings as good as possible and no damage is induced to the tool while processing.
Samples and Process Specifications
| Specifics | Range | Comments | |
|---|---|---|---|
| Temperature | Pyro Control |
|
|
| Thermocouple Control |
|
||
|
|||
| Process gas | Argon (Ar) |
|
|
| Nitrogen (N2) |
|
||
| Forming gas (4% H2/ 96% N2) |
|
Gas line not connected yet. | |
| Nitrogen purge (N2) |
|
Do not use for processing. | |
| Pressure | No vacuum |
|
|
| Vacuum |
|
5/6 mbar, if minimum gas flow is used during process. | |
| Process time | At 1100 oC |
|
|
| At 1000 oC |
|
||
| At 900 oC |
|
||
| At 800 oC |
|
||
| At 700 oC |
|
||
| < 700 oC |
|
||
| < 500 oC |
|
||
| Heating rate |
|
At faster heating rates, the actual temperature might overshoot from the temperature setpoint in the recipe, and the susceptors/carriers might break. | |
| Substrates | Batch size |
|
|
| Substrate size |
|
Small samples must be placed on dedicated carrier wafers/susceptors. These do not need to and should not be bonded to the carriers. | |
| Allowed materials |
|
Always check the cross contamination information in LabManager to see whether your samples are allowed in the RTP2 Jipelec before using it. If you want to anneal sample materials that are not on the list or not approved, please contact the Thin Film group | |
*Remark! The time limits are not implemented in the software, but it is very important to obey these. If processing is done for longer times than those defined in the table, there is a certain risk that the chamber gets overheated, which can lead to damage of the equipment.
Existing PID and Pyro Calibration Tables
As mentioned before, the temperature inside the chamber is controlled by either using a thermocouple and/or an optical pyrometer. In order to guarantee a smooth temperature control while processing, it is important that the right couple of tables - PID and Pyrometer Calibration - are selected in the recipe. There are multiple PID and Pyro Calibration tables available at the tool, which were developed and optimized by the process specialists in the Thin Film group. These are material- and sensor-dependent, so they are labeled with abreviations of the conditions they should be used for. You can access the list of the existing tables in the tool's Labmanager page, under documents.
- PID tables - This table contains the essential coefficients that manage the lamps' power output, ensuring a smooth and controlled process to maintain the temperature at the desired setpoint during processing.
- Pyro Cal Tables - Calibrating the optical pyrometer requires the use of a thermocouple as a reference, given that optical pyrometry is a non-contact temperature measurement method. As a result of such calibration process, a table is created. The pyrometer calibration table correlates temperatures recorded by the reference thermocouple with the electrical signals produced by the pyrometer. Essentially, this table functions as a 'translator,' indicating to the user the temperature corresponding to a specific output from the pyrometer.
Additional information
The user manual, user APV, technical documents and contact information can be found in LabManager: RTP2 Jipelec
