Specific Process Knowledge/Lithography/Descum: Difference between revisions
No edit summary |
No edit summary |
||
| (7 intermediate revisions by the same user not shown) | |||
| Line 1: | Line 1: | ||
{{cc-nanolab}} | |||
'''Feedback to this page''': '''[mailto:labadviser@nanolab.dtu.dk?Subject=Feed%20back%20from%20page%20http://labadviser.nanolab.dtu.dk/index.php?title=Specific_Process_Knowledge/Lithography/Descum click here]''' | '''Feedback to this page''': '''[mailto:labadviser@nanolab.dtu.dk?Subject=Feed%20back%20from%20page%20http://labadviser.nanolab.dtu.dk/index.php?title=Specific_Process_Knowledge/Lithography/Descum click here]''' | ||
[[Category: Equipment|Lithography descum]] | [[Category: Equipment|Lithography descum]] | ||
| Line 10: | Line 11: | ||
[[File:Descum Results aug 2019.png|640px|thumb|right|Descum results plasma asher 1. September 2019]] | [[File:Descum Results aug 2019.png|640px|thumb|right|Descum results plasma asher 1. September 2019]] | ||
The user manual(s), quality control procedure(s) and results and contact information can be found in [http://labmanager.dtu.dk/function.php?module=Machine&view=view&mach=55 LabManager] - '''requires login''' | |||
Descum of AZ5214E resist on 50mm silicon wafer. Wafer was placed horisontally in chamber on a 100 mm carier wafer. | Descum of AZ5214E resist on 50mm silicon wafer. Wafer was placed horisontally in chamber on a 100 mm carier wafer. | ||
| Line 22: | Line 23: | ||
{| {{table}} | {| {{table}} | ||
| align="center" | | | align="center" | | ||
{| border="1" cellspacing="1" cellpadding=" | {|border="1" cellspacing="1" cellpadding="10" style="text-align:left;" | ||
|- style="background:LightGrey" | |- style="background:LightGrey" | ||
|'''Ashing time (min)'''|| 1|| 2 || 5 || 7 || 10 || 10 | |'''Ashing time (min)'''|| 1|| 2 || 5 || 7 || 10 || 10 | ||
| Line 39: | Line 40: | ||
{| {{table}} | {| {{table}} | ||
| align="center" | | | align="center" | | ||
{| border="1" cellspacing="1" cellpadding=" | {|border="1" cellspacing="1" cellpadding="10" style="text-align:left;" | ||
|- style="background:LightGrey" | |- style="background:LightGrey" | ||
|'''Ashing time (min)'''|| 1|| 2 || 5 || 7 || 10 || 10 | |'''Ashing time (min)'''|| 1|| 2 || 5 || 7 || 10 || 10 | ||
| Line 66: | Line 67: | ||
{| {{table}} | {| {{table}} | ||
| align="center" | | | align="center" | | ||
{| border="1" cellspacing="1" cellpadding=" | {|border="1" cellspacing="1" cellpadding="10" style="text-align:left;" | ||
|- style="background:LightGrey" | |- style="background:LightGrey" | ||
| Line 80: | Line 81: | ||
{| {{table}} | {| {{table}} | ||
| align="center" | | | align="center" | | ||
{| border="1" cellspacing="1" cellpadding=" | {|border="1" cellspacing="1" cellpadding="10" style="text-align:left;" | ||
|- style="background:LightGrey" | |- style="background:LightGrey" | ||
| Line 94: | Line 95: | ||
{| {{table}} | {| {{table}} | ||
| align="center" | | | align="center" | | ||
{| border="1" cellspacing="1" cellpadding=" | {|border="1" cellspacing="1" cellpadding="10" style="text-align:left;" | ||
|- style="background:LightGrey" | |- style="background:LightGrey" | ||
| Line 108: | Line 109: | ||
{| {{table}} | {| {{table}} | ||
| align="center" | | | align="center" | | ||
{| border="1" cellspacing="1" cellpadding=" | {|border="1" cellspacing="1" cellpadding="10" style="text-align:left;" | ||
|- style="background:LightGrey" | |- style="background:LightGrey" | ||
| Line 123: | Line 124: | ||
[[image:descum_graf.jpg|640px|thumb|Descum results plasma asher 2 - recipe 1]] | [[image:descum_graf.jpg|640px|thumb|Descum results plasma asher 2 - recipe 1]] | ||
The user manual(s), quality control procedure(s) and results and contact information can be found in [http://labmanager.dtu.dk/function.php?module=Machine&view=view&mach=200 LabManager] - '''requires login''' | |||
Descum of AZ Mir 701 resist on 100mm silicon wafer. Five wafers were placed vertically in chamber. | Descum of AZ Mir 701 resist on 100mm silicon wafer. Five wafers were placed vertically in chamber. | ||
| Line 134: | Line 135: | ||
{| {{table}} | {| {{table}} | ||
| align="center" | | | align="center" | | ||
{| border="1" cellspacing="1" cellpadding=" | {|border="1" cellspacing="1" cellpadding="10" style="text-align:left;" | ||
|- style="background:LightGrey" | |- style="background:LightGrey" | ||
| Line 155: | Line 156: | ||
{| {{table}} | {| {{table}} | ||
| align="center" | | | align="center" | | ||
{| border="1" cellspacing="1" cellpadding=" | {|border="1" cellspacing="1" cellpadding="10" style="text-align:left;" | ||
|- style="background:LightGrey" | |- style="background:LightGrey" | ||
| Line 171: | Line 172: | ||
=Plasma Asher 3: Descum= | =Plasma Asher 3: Descum= | ||
The user manual(s), quality control procedure(s) and results and contact information can be found in [http://labmanager.dtu.dk/function.php?module=Machine&view=view&mach=423 LabManager] - '''requires login''' | |||
Plasma Asher 3 is specifically used for controlled descum process after lithography. Please note that you only can process a single 100 mm wafer, or one small sample, at a time. | Plasma Asher 3 is specifically used for controlled descum process after lithography. Please note that you only can process a single 100 mm wafer, or one small sample, at a time. | ||
| Line 194: | Line 195: | ||
{| {{table}} | {| {{table}} | ||
| align="center" | | | align="center" | | ||
{| border="1" cellspacing="1" cellpadding=" | {|border="1" cellspacing="1" cellpadding="10" style="text-align:left;" | ||
|- style="background:LightGrey" | |- style="background:LightGrey" | ||
| ||FW/REV|| C2/C1 || Power | | ||FW/REV|| C2/C1 || Power | ||
| Line 222: | Line 223: | ||
{| {{table}} | {| {{table}} | ||
| align="center" | | | align="center" | | ||
{| border="1" cellspacing="1" cellpadding=" | {|border="1" cellspacing="1" cellpadding="10" style="text-align:left;" | ||
|- style="background:LightGrey" | |- style="background:LightGrey" | ||
| ||FW/REV|| C2/C1 || Oxygen || Pressure | | ||FW/REV|| C2/C1 || Oxygen || Pressure | ||
| Line 248: | Line 249: | ||
{| {{table}} | {| {{table}} | ||
| align="center" | | | align="center" | | ||
{| border="1" cellspacing="1" cellpadding=" | {|border="1" cellspacing="1" cellpadding="10" style="text-align:left;" | ||
|- style="background:LightGrey" | |- style="background:LightGrey" | ||
| ||FW/REV|| C2/C1 || Oxygen || Pressure | | ||FW/REV|| C2/C1 || Oxygen || Pressure | ||
Latest revision as of 13:55, 10 May 2023
The contents on this page, including all images and pictures, was created by DTU Nanolab staff unless otherwise stated.
Feedback to this page: click here
Plasma Asher 1
The user manual(s), quality control procedure(s) and results and contact information can be found in LabManager - requires login
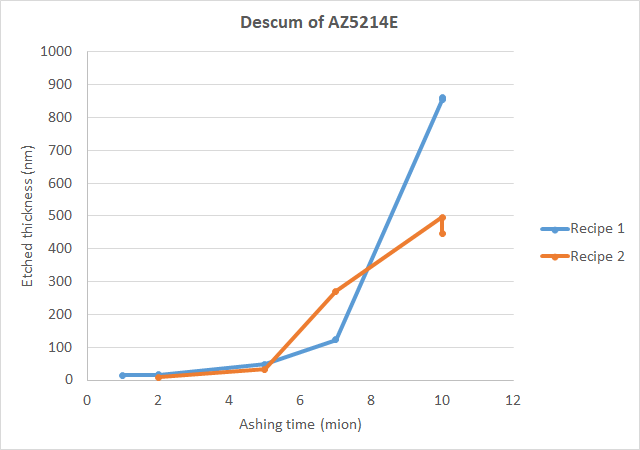
Descum of AZ5214E resist on 50mm silicon wafer. Wafer was placed horisontally in chamber on a 100 mm carier wafer.
Recipe 1:
Note: Plasma asher was cold before use
- O2 flow: 70 ml/min
- N2 flow: 70 ml/min
- Power: 150 W
|
Recipe 2:
Note: Plasma asher was cold before use
- O2 flow: 500 ml/min
- N2 flow: 0 ml/min
- Power: 500 W
|
Descum tests on UV resists
Conny Hjort & Jesper Hanberg, September 2021
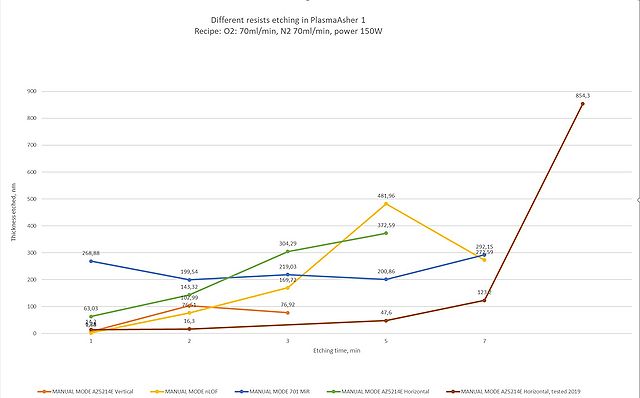
Descum of different resists, AZ5214E, AZ701 MiR and AZ2020 nLOF, on a single 100mm wafer was tested. Wafer was placed vertically in the middle of glass carrier.
Recipe settings:
Note: plasma Asher was cold before use.
- O2 flow: 70 ml/min
- N2 flow: 70 ml/min
Power: 150 W
Minor temperature rise during processing was observed, but not more than 5 degrees. Starting chamber pressure was around 0.5 mbar.
1,5 um AZ5214E resist:
|
1,5 um AZ5214E resist placed horizontally in the carrier:
|
1,5 um AZ701MiR resist:
|
1,5 um AZ 2020nLOF resist:
|
Plasma Asher 2
Jitka Urbánková & Jesper Hanberg, December 2019
The user manual(s), quality control procedure(s) and results and contact information can be found in LabManager - requires login
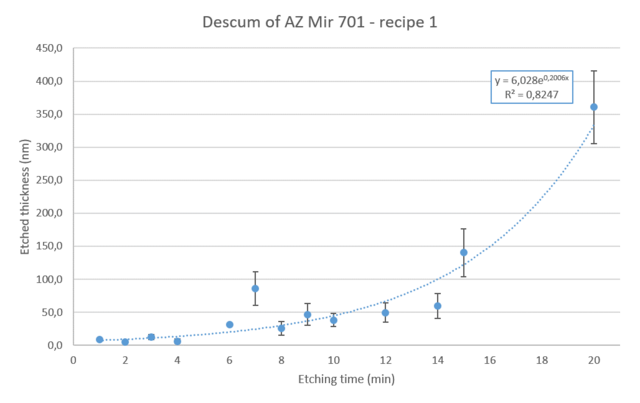
Descum of AZ Mir 701 resist on 100mm silicon wafer. Five wafers were placed vertically in chamber.
recipe 1:
- O2 flow: 100 ml/min
- N2 flow: 100 ml/min
- Power: 150 W
|
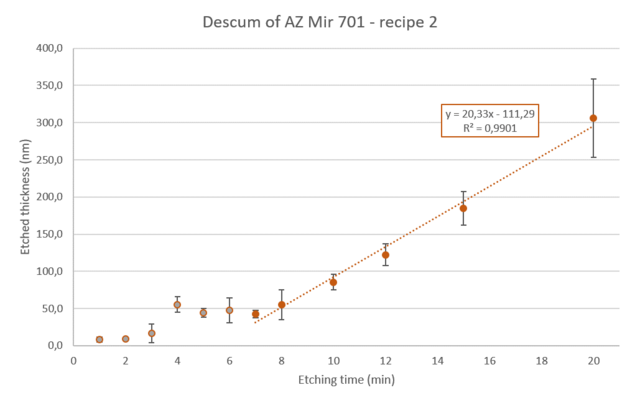
recipe 2:
- O2 flow: 500 ml/min
- N2 flow: 0 ml/min
- Power: 200 W
|
A linear time dependence was observed after etching 7 minutes or more (recipe 2).
Plasma Asher 3: Descum
The user manual(s), quality control procedure(s) and results and contact information can be found in LabManager - requires login
Plasma Asher 3 is specifically used for controlled descum process after lithography. Please note that you only can process a single 100 mm wafer, or one small sample, at a time. The plasma asher is equipped with 2 gaslines: oxygen and nitrogen, but all standard processes use only oxygen (as recommended by Diener).
Ashing of AZ MiR701 resist:
You can use two different descum process developments: you can either change power settings or processing chamber pressure.
Testing different power settings:
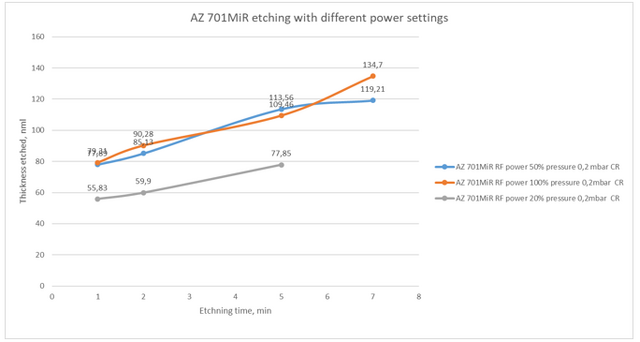
Recipe settings:
- O2 flow: 5 sccm
- N2 flow: 0
- Pressure: 0.2 mbar
- Power: Varied
Experiment parameters:
|
Testing different pressure settings:
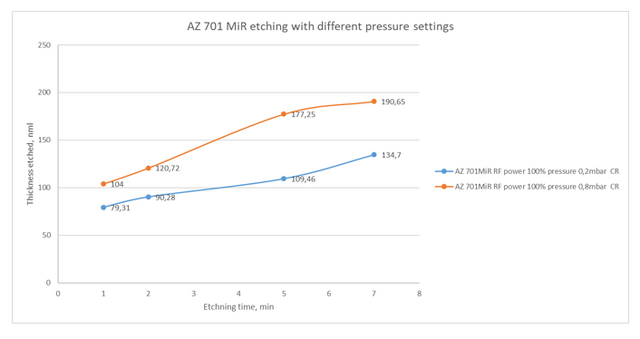
Recipe settings:
- O2 flow: varied
- N2 flow: 0
- Pressure: varied
- Power: V100% (100 W)
Experiment parameters:
|
Ashing of AZ5214E resist:
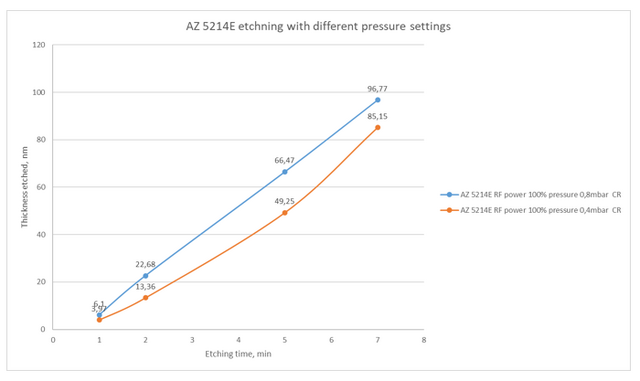
Recipe settings:
- O2 flow: varied
- N2 flow: 0
- Pressure: varied
- Power: V100% (100 W)
Experiment parameters:
|
