Specific Process Knowledge/Back-end processing/Polymer Injection Molder/Eject
Ejection
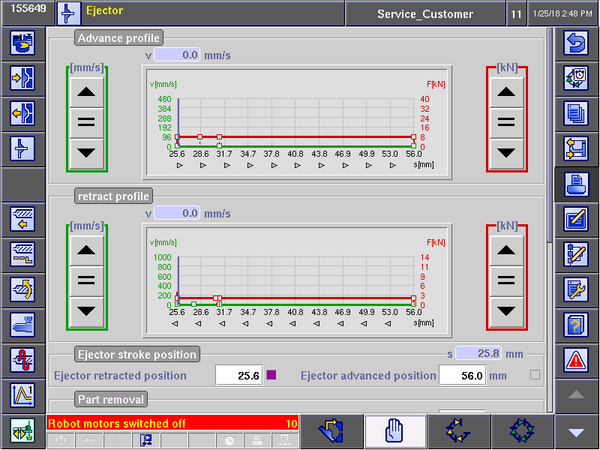
Once the mold has opened, the sample must be ejected from the mold to enable the robot to pick up the sample. This is done by pushing out ejector pins from within the mold, which in turn will push out the sample. Once samples are picked up reliably by the robot it is usually not necessary to adjust these settings. Parameters for the ejector pins can be found on the 'Ejector' screen:

- Advance profile: These settings control how the ejector pins advance. The advance speed (green curve) and advance force (red curve) can be edited using the '=' or arrow buttons or by editing individual points on the graph. Generally it is not advisable to increase the advance speed above a few mm/s. And importantly: Under no circumstances should the advance force be increased above 8 kN! Otherwise the ejector pins may be damaged (bend or even break)! It is recommended to keep the advance force at 6 kN or below and only increase it to 8 kN if samples cannot be demolded reliably.
- Retract profile: These parameters control the ejector pin retraction and is edited in the same way as described for the advance force.
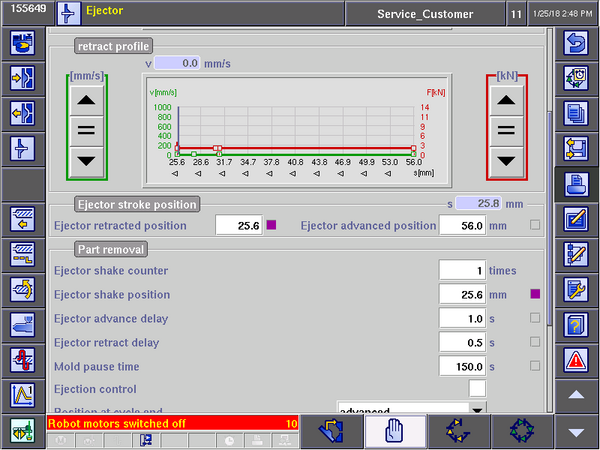
- Ejector stroke position: These settings control the positions of the ejector pins in the retracted and advanced position. It is recommended to leave the 'Ejector retracted position' around 25,6 mm. The 'Ejector pin advanced position' can be fine tuned if you have problems with unreliable robot pickup, but 56,0 mm usually works well. If you make changes to the 'Ejector advanced position' make sure to adjust the robot take-off position as well. Otherwise you risk missing the sample or that the sample is pushed hard into the robot arm and thus risk damaging both the robot and your samples. As mentioned in the 'Closing mold' chapter, remember that the the 'Opening stroke' parameter also influences the position at which the robot must pick up the sample.
Scrolling down will reveal a few more important settings regarding part removal. The most important are:

- Ejector shake counter: If samples are difficult to release from the moving part of the mold, this setting makes it possible to move ejector pins in and out several times to help releasing the sample in order for the robot to be able to grab the sample. Usually leaving it at 1 works fine (meaning the ejector pins will move out once and the robot will immediately attempt to pick up the sample), but in some cases it may help to increase the shake counter to 2 or 3.
- Ejector shake position: This position defines the position the ejector pins move to during shake procedures.
- Mold pause time: This setting is often used when running variable mold temperature ("Variotherm") processes where a delay is required in order to give the mold time to heat back up to the desired mold temperature before the next cycle can be started. The required time will depend on how cold the mold is at this point in the cycle and the mold temperature setpoint. If the mold has cooled down to 40°C and needs to heat up to 140°C it will usually take several minutes to do so (usually 3-4 minutes). The 'Mold pause time' is an easy way of achieving this, since this a delay at the end of the cycle. When running constant mold temperature processes, the mold pause time can be set to zero, since no delay is required (the mold temperature is always at the correct temperature).
