Specific Process Knowledge/Back-end processing/Polymer Injection Molder/Demolding: Difference between revisions
Created page with "== Demolding == Demolding is the process of opening the mold and thereby pulling the sample off the shim. Many of the previously mentioned parameter will influence the demold..." |
|||
| (5 intermediate revisions by the same user not shown) | |||
| Line 1: | Line 1: | ||
== Demolding == | == Demolding == | ||
Demolding is the process of opening the mold and thereby pulling the sample off the shim. Many of the previously mentioned | Demolding is the process of opening the mold and thereby pulling the sample off the shim. Many of the previously mentioned parameters will influence the demolding process. Generally, the higher the mold temperature, the faster injection speed, the higher switchover/after pressure and the larger the structured area, the more difficult it can be to demold the sample. If the shim thickness is not optimal, polymer may also get in between the shim and the holding plate, making demolding almost impossible. A very critical parameter in easy demolding is designing the structures in a way, that makes them easier to demold (side walls of deep structures should not be completely vertical but have appropriate slip angles to aid in release and roughness of side walls can also severely impact the release properties). | ||
The | The demolding settings are found on the 'Mold open' screen: | ||
[[File:06-demold.png|600px|thumb|left|Parameters for opening the mold is found on the 'Mold Open' screen.]] | [[File:06-demold.png|600px|thumb|left|Parameters for opening the mold is found on the 'Mold Open' screen.]] | ||
<br><br> | |||
*''' | *'''Opening profile''': A constant speed can be set using the '=' button or the arrows. Alternatively individual points of the graph can be edited. If samples tend to break during demolding it might help lowering the opening speed. In general the speed should be low towards the end position (fully open position) to avoid violently slamming the mold against the end stop. | ||
*''' | <br> | ||
*''' | *'''Mold stroke position''': This value defines how far the mold opens. It should generally be avoided to open the mold all the way to the end position, since this causes the mold to bang violently into the end stop. If this happens (you hear a bang every time the mold reaches the open position) decrease the mold stroke position by a few millimeter (e.g. change the stroke from 235 mm to 232 mm). Remember that changing the opening stroke will also change sample take-off position, so remember to adjust the take off position (under robot settings) accordingly. | ||
<br> | |||
*'''Sequence settings''': These settings change how the robot is allowed to move around the mold. These settings should generally not be changed (be very careful if you do) to avoid crashing the robot into the mold. | |||
Latest revision as of 12:18, 7 August 2020
Demolding
Demolding is the process of opening the mold and thereby pulling the sample off the shim. Many of the previously mentioned parameters will influence the demolding process. Generally, the higher the mold temperature, the faster injection speed, the higher switchover/after pressure and the larger the structured area, the more difficult it can be to demold the sample. If the shim thickness is not optimal, polymer may also get in between the shim and the holding plate, making demolding almost impossible. A very critical parameter in easy demolding is designing the structures in a way, that makes them easier to demold (side walls of deep structures should not be completely vertical but have appropriate slip angles to aid in release and roughness of side walls can also severely impact the release properties).
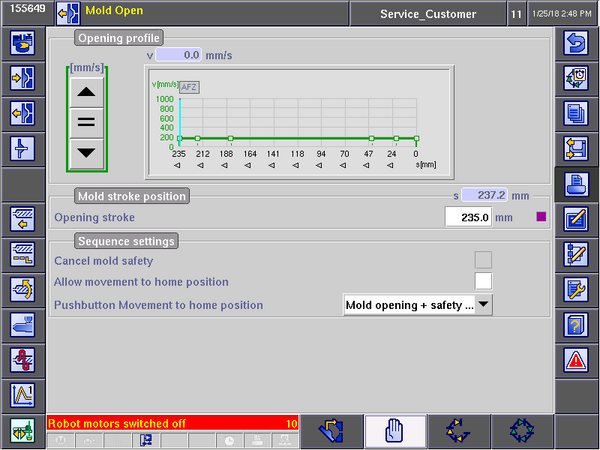
The demolding settings are found on the 'Mold open' screen:

- Opening profile: A constant speed can be set using the '=' button or the arrows. Alternatively individual points of the graph can be edited. If samples tend to break during demolding it might help lowering the opening speed. In general the speed should be low towards the end position (fully open position) to avoid violently slamming the mold against the end stop.
- Mold stroke position: This value defines how far the mold opens. It should generally be avoided to open the mold all the way to the end position, since this causes the mold to bang violently into the end stop. If this happens (you hear a bang every time the mold reaches the open position) decrease the mold stroke position by a few millimeter (e.g. change the stroke from 235 mm to 232 mm). Remember that changing the opening stroke will also change sample take-off position, so remember to adjust the take off position (under robot settings) accordingly.
- Sequence settings: These settings change how the robot is allowed to move around the mold. These settings should generally not be changed (be very careful if you do) to avoid crashing the robot into the mold.
