Specific Process Knowledge/Back-end processing/Polymer Injection Molder/Dosing
Jump to navigation
Jump to search
Dosing (Plasticizing)
Plasticizing is the process of dosing polymer pellets into the heating cylinder and press it forwards to melt and circulate (knead) the polymer melt inside the heating cylinder. A major part of the heat required to melt the polymer originates from friction energy during this kneading process. Some polymers are very sensitive to heat and thus must be dosed/plasticized gently to avoid decomposition. If samples turn out yellowish or brown it is likely to be caused by too harsh plasticizing settings (or too high heating cylinder temperatures). This problem can thus often be solved by decreasing dosing speed and/or back pressure.
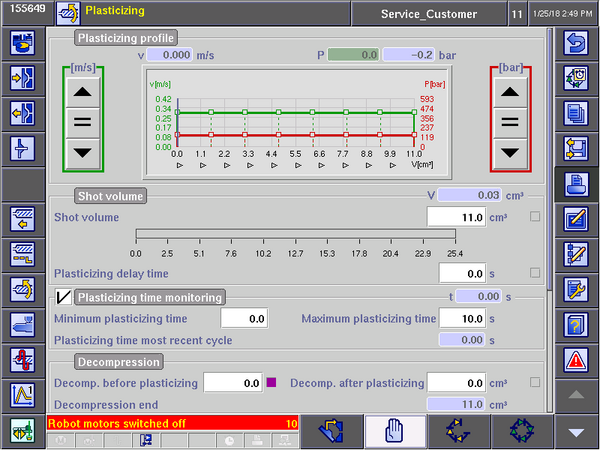
The dosing/plasticizing settings are found on the 'Plasticizing' screen:
- Dosing speed: Dosing speed is adjusted by pressing the left (green) '=' sign and entering a value. Alternatively the up/down arrow can be used or the points of the green graph may be edited directly. It is recommended not to increase the speed above ~0,34 m/s. For sensitive polymers it may be necessary to lower the speed.
- Back pressure: The back pressure is adjusted by pressing the right (red) '=' sign and entering a value, using the arrows or editing the red curve points directly. During dosing the only thing that moves the screw backwards is polymer entering the cylinder and thus pushing the screw backwards. A back pressure is used to "press against" this motion. The higher the back pressure the harder 'kneading' of the polymer. Again, some sensitive polymers might require reduced back pressures to avoid thermal damage (decomposition) of the polymer. It is usually sufficient to keep the back pressure at 120 bars or below, but in some cases (e.g. when using pigments) a higher back pressure can give better mixing of pigment and polymer. But be aware of the risks involved regarding decomposition of the polymer.
- Shot volume: This is the setpoint for the amount of polymer that is loaded into the heating cylinder. Note that this number in no way represents the amount of polymer injected into the mold cavity (besides the fact that the amount of injected polymer can of course never exceed the shot volume). The volume of polymer actually injected is defined via parameters on the "Switchover" screen mentioned earlier. As mentioned earlier a shot volume resulting in a cushion of about 1,5 cm3 is recommended. Loading much more polymer than required for the shot increases the residence time of the polymer in the heating cylinder. This is undesired since it increases the risk of thermal degradation of the polymer.
- Plasticizing delay time: Adjusting this parameter it is possible to insert a delay between end of holding pressure and plasticizing. This can be beneficial if running processes with long cycle times (usually Variotherm-processes) in which case the polymer is in risk of thermal degradation inside the heating cylinder because it will stay there for a long time. In this case it makes sense to enter a delay so that plasticizing finishes briefly before cooling time has elapsed (a delay which is ~5 seconds less than the cooling time would be a good starting point). For processes with constant mold temperature (where cycle times are usually comparatively low) this value can be left at zero to minimize wasted time.
- Plasticizing time monitoring: It is recommended to always keep this enabled (it must remain enabled if leaving the machine running unattended) to make sure the machine stops in case of errors. Usually the maximum plasticizing time is set around 4-8 times the actual plasticizing time (which can be seen in the light blue field just above the setpoint). In this particular screenshot it shows 0,00 sec because no samples has been produced yet after the machine was started. A good starting point for 'Maximum plasticizing time' is around 2-5 times the normal plasticizing time. Then there's amble time for normal fluctuations.
- Decompression: To avoid problems with stress in the polymer melt it can be a good idea to enable decompression. A setpoint of 1 cm3 works well for most cases. This means that after plasticizing the screw moves a little further backwards to provide extra volume for the polymer melt to relax. This is particularly beneficial if running at high back pressure.
