LabAdviser/314/Preparation 314-307/Soft-matter: Difference between revisions
No edit summary |
|||
| Line 29: | Line 29: | ||
<br clear="all" /> | <br clear="all" /> | ||
= High Pressure Freezer = | <!--= High Pressure Freezer = | ||
== Leica EM ICE ('''COMING SOON''') == | == Leica EM ICE ('''COMING SOON''') == | ||
High pressure freezing is key for the study of intricate changes in fine structure or cellular dynamics. | High pressure freezing is key for the study of intricate changes in fine structure or cellular dynamics. | ||
| Line 60: | Line 60: | ||
For further information on the equipment usage or training contact mktracy@dtu.dk [https://www.dtu.dk/english/service/phonebook/person?id=141983&cpid=260636&tab=0]. | For further information on the equipment usage or training contact mktracy@dtu.dk [https://www.dtu.dk/english/service/phonebook/person?id=141983&cpid=260636&tab=0]. | ||
<br clear="all" /> | <br clear="all" /> --> | ||
= Microtome = | = Microtome = | ||
Revision as of 10:27, 7 October 2020
Feedback to this page: click here
Plunge Freezer
Leica EM GP2
Plunge freezing is a cryo-fixation method used to preserve samples in their most native state prior to cryo-electron microscopy. The EM GP2 plunge freezes fluid or extremely thin samples spread on an electron microscopy grid into liquid ethane after removing excess fluid by automatic blotting. Prior to freezing, the sample is maintained in a temperature and humidity controlled environmental chamber, adjustable between +4°C and +60°C and room humidity to 99 %.
The main steps of this technique proceed as follows:
1. The sample is spread into a thin film across an EM grid
2. The liquid droplet is then blotted with filter paper until only a very thin film of fluid remains
3. The grid is then rapidly plunged into a cryogen (usually liquid ethane)
4. The grid is afterwards stored in a grid box submerged in liquid nitrogen until finally loaded into the cryo-electron microscope for imaging
Operating manual: File:Leica EM GP2 Operating manual.pdf
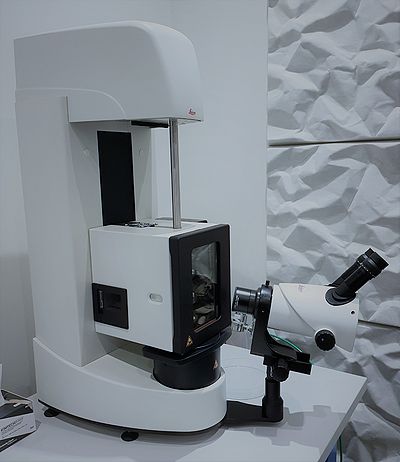
For further information on the equipment usage or training contact mktracy@dtu.dk [1].
Microtome
RMC MT-7 Microtome
Our RMC MT-7 Microtome is a vintage piece of equipment and can be used for planning specimens for SEM/EDX and/or for cutting relative thin slices (approx. 200nm thick) for TEM. First, the specimen needs to be embedded into a resin or an epoxy, and then can be sliced with a glass or diamond knife.
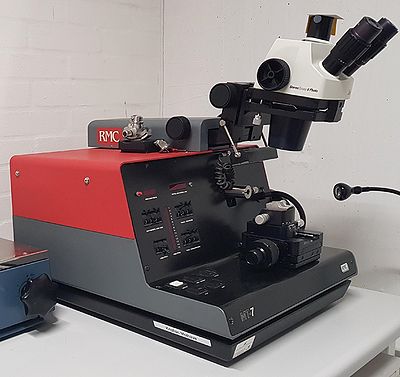
For further information about the microtome usage contact mktracy@dtu.dk [2].
Leica EM UC7 Ultramicrotome
The Ultramicrotome Leica EM UC7 provides easy preparation of semi- and ultrathin sections as well as perfect, smooth surfaces of biological and industrial samples for TEM, SEM, AFM and LM examination. Combining ergonomic design and innovative technology the Ultramicrotome Leica EM UC7 sets new standards in Ultramicrotomy. It offers a range of outstanding features and benefits of use for the ultramicrotomist, whether highly skilled or absolute beginners.
The Leica ultramicrotome is used for ultra thin sectioning of sample embedded in resin block with a feed range of 1 nm up to 15 µm. Glass or diamond knife can be used for the ultra sectioning of the samples.
The main steps of this technique proceed as follows:
1. Mount sample
2. Mount glass or diamond knife to knife holder
3. Trimming and ultrasectioning of sample
4. Fishing sections
5. Transfer to an EM grid
6. EM imaging
Operating manual: File:EM UC7 Operating manual.pdf
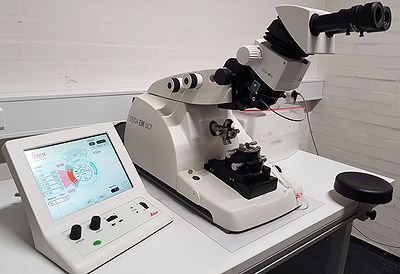
For further information about the equipment usage or training contact mktracy@dtu.dk [3].
Leica EM FC7 Cryo-Ultramicrotome
Within minutes the Leica EM UC7 ultramicrotome can change to a cryo-ultramicrotome by mounting the cryo chamber EM FC7. Cryo-sections (-15° to -185°C) can be prepared for TEM, SEM, AFM and LM.
The main steps of this technique proceed as follows:
1. Set up the cryo chamber EM FC7 to the EM UC7 apparatus
2. Mount both the trim and sectioning diamond knives to the knive holder and set up in the cryo chamber
3. Fill up liquid nitrogen Dewar
4. Set pump between the liquid nitrogen Dewar and the ultramicrotome apparatus
5. Let equipment to cool down for 1 hour
6. Meanwhile prepare samples
7. Mount sample
8. Trimming and ultrasectioning of sample
9. Collecting sections and transfer to an EM grid
Operating manual: File:EM FC7 Operating manual.pdf

For further information about the equipment usage or training contact mktracy@dtu.dk [4].
KnifeMaker
LKB Knifemaker 7801A
At DTU Nanolab we offer the possibility to make glass knives using the LKB Knifemaker 7801A.
Manual of LKB Knifemaker 7801A: File:LKB Knifemaker 7800B Manual.pdf
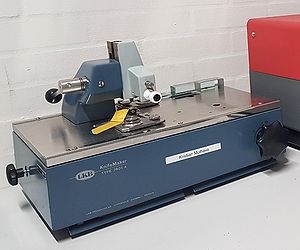
For further information about the knifemaker usage and training contact mktracy@dtu.dk [5].
Critical point dryer
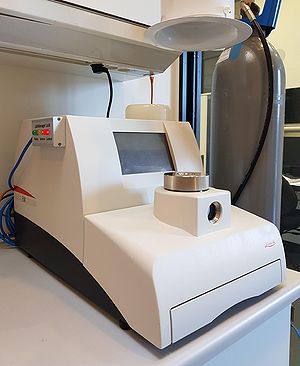
Leica EM CPD300
The CPD is used to preserve the sample’s morphology. Since air drying would cause severe deformation and collapse of structure due to the effects of high surface tension to air, the water in the biological specimen is replaced with a suitable inert fluid (“transitional fluid”-CO2) which has a lower surface tension to air. This would thus reduce severe structural damages during air-drying.
Because liquid CO2 is not sufficiently miscible with water, a third medium commonly Acetone or Ethanol is used as “intermediate fluid”. The specimen is first dehydrated through varying concentrations of the intermediate fluid and thus completely replacing the water in the specimen. Afterwards, the “intermediate fluid” is replaced with the “transitional fluid” (CO2) which can then convert from liquid to gas phase without surface tension effects which distort morphology and ultra-structure.
Operating manual: File:EM CPD300 Operating manual.pdf
For further information on the CPD usage or training contact mktracy@dtu.dk [6].
Drying oven
The TS9026 drying oven is of 26L capacity and is used for epoxy embedding experiments.

For further information on the equipment usage contact mktracy@dtu.dk [7].
Mini tube rotator
The mini-tube rotator is designed for rotating various sized laboratory tubes at a variety of mixing angles at speeds ranging from 4 to 18 min–1. Ideal for mixing and separation processes involved in molecular biology, histochemistry and clinical applications.
- Variable speed with LCD display
- Digital microprocessor control
- An adjustable 0 – 90° mixing angle
- Interchangeable carousels for all common laboratory tubes
- Cold room and incubator compatible

For further information on the equipment usage contact mktracy@dtu.dk [8].
Centrifuge
The Eppendorf Mini Spin plus centrifuge is a desktop centrifuge with supplied rotor with maximum speed/force 13,400rpm/12,100xG. It has a 30-minute timer, which is settable in 15-sec increments. It has a short-spin mode fixed at maximum speed. The Mini Spinner Eppendorf is located in building 314, in the Soft Mater (toxic) Lab.

For further information on the equipment usage contact mktracy@dtu.dk [9].
pH meter
If you are planning on doing chemical fixation on biological samples you will probably need to make buffers and use a pH-meter. The VWR pH-meter (model pH 1000L) is located in building 314, in the Soft Mater (toxic) Lab and it is dedicated to “Soft Matter” related work.

For further information on the equipment usage contact mktracy@dtu.dk [10].
Pulsing Vortex Mixer
VWR pulsing vortex mixer with features to suit different applications. The vortex mixer provide optimum comfort and minimal stress.
- Can be used at 4 to 40 °C (maximum 85% relative humidity, non condensing), in an incubator, CO₂ incubator or cold room
- Pulsing model has unique action which reduces heat generation and ensures efficient mixing and disruption
- Digital and pulsing units have timer, 1 s to 160 h

For further information on the equipment usage contact mktracy@dtu.dk [11].
Sonic Dismembrator
The Fisherbrand Model 505 sonic dismembrator apparatus applies sound energy to agitate particles in a sample. In biological applications, sonication may be sufficient to disrupt or deactivate a biological material. For example, sonication is often used to disrupt cell membranes and release cellular contents. In nanotechnology sonication is commonly used for evenly dispersing nanoparticles in liquids.

For further information on the equipment usage contact mktracy@dtu.dk [12].
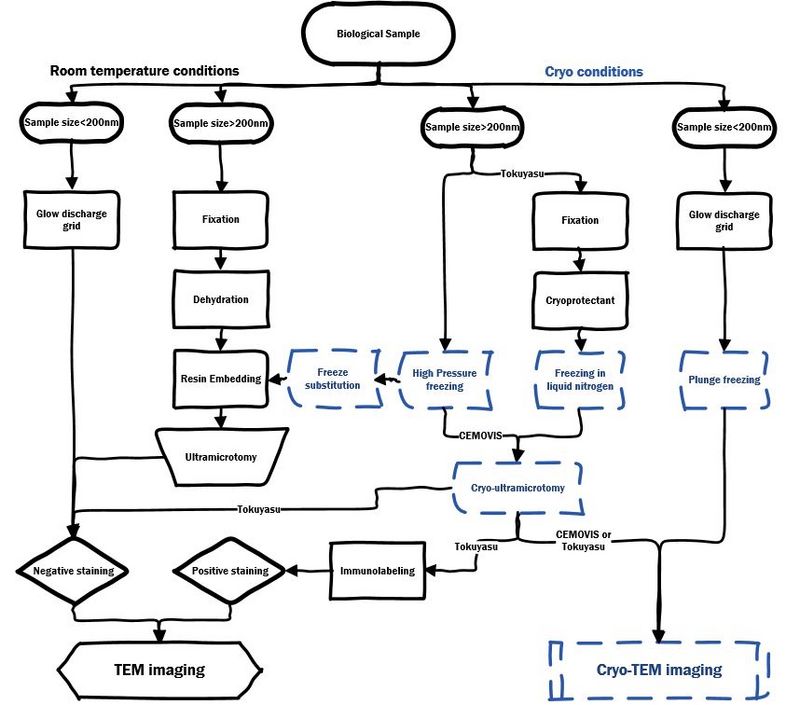
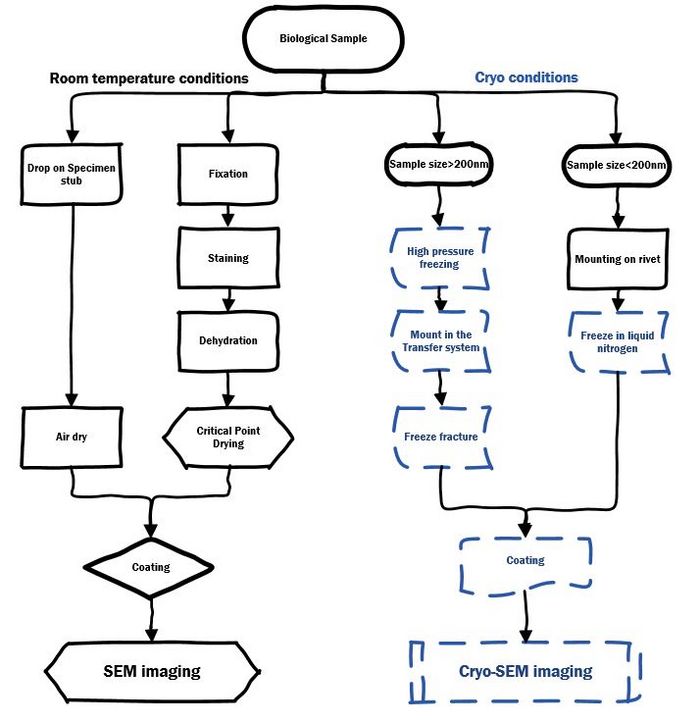
EM sample preparation workflow
For TEM imaging of biological sample at room temperature or cryo conditions:
For SEM imaging of biological sample at room temperature or cryo conditions:
For further information on EM sample preparation of biological samples contact mktracy@dtu.dk [13].
